Welcome to my Blog!

Hi there, nice to have you visiting! I'm Heidi and this is the blog for Heidi Bears. Here is where I post all the happenings in my work and daily life. Here and there you'll find info on things that have caught my attention as well as the odd tutorial. I hope you enjoy your visits. I love to have feedback, so leave me a comment!

Wednesday, February 2, 2011

Hoo are you?


I found a lovely post on Night Owl Crafting, a random questions about me called "Hoo are you?"
So, in the spirit of sharing, here are my answers... I don't for a moment think that the majority of the readers who travel on this little blogger road of mine, will feel the earth move when reading this post, but, as I said before, there may the odd owl who enjoys a bit of distanced gossip... :)


♥Married♥..... yup! fortunately to my best friend....
My husband's name is Gerry, and we met at a huge general hospital here in Johannesburg, while I was doing my medical internship. Gerry was, at the time, a registrar in Internal Medicine (he was busy with his specialization rotation), and was given the onerous task of supervising my first official forays into the quagmire of patient care.

Of course, the romance blossomed in typical "General Hospital "style ;) , and after approximately 3 months of having been together (around a hundred and twenty hours of working together a week...yes, those were tough days, my friends....), decided that we should get married... Life and exams intervened, and 2 years passed before we eventually got married in 1995. By then , I was also in a specializing post, and although we did have a honeymoon, our lives consisted for a long time, of stumbling from one exam to the next in a kind of round-robin hell.... Thankfully, Gerry's last set of exams took place in 2006, and he is now an Intensivist (this is a doctor, who is a specialist in Intensive Care Medicine).

Although we sometimes drive each other crazy, and are capable of quite spectacular fights (both being somewhat passionate beings...), we are very happily married.


2. What do you do for a living? Do you enjoy it?

As noted above, I am a medical doctor by training, but prefer to think of myself as "the accidental tourist".... joking...
Seriously.... my walk through medicine has been interesting, and varied. I spent several years in a specialist training post, but gave birth to my oldest daughter shortly before my final exams, and once she made her presence felt in this world (as opposed to the over-crowded neighbourhood of the liver and the bladder), I couldn't go back to work and leave her with someone else... This resulted in some serious financial difficulties, as Gerry was till working in a government hospital post and earning the odd peanut here and there...
Somehow, though, we managed and I became a stay at home mommy. Best thing I ever did!
Over the years, as the girls started going to nursery school, and then school, I have worked part time in medicine, in a big variety of fields...I have spent some time in HIV medicine, Accident and Emergency medicine, a bit of Aesthetic medicine, and more recently, I am working part time in the ICU with Gerry.

I have also run various small businesses over the years, including embroidery, photography, artist bears design and making, digital scrapbooking, to mention a few. I am very easily bored and find I have to change creative outlets often. The longest lasting crafty type thing that I have stuck to , is knitting, crochet and sewing. I KNIT EVERY DAY FOLKS! Love it...love it....love it!

Other than that, I organize our lives (Gerry has a hectic practice and the admin of running our lives is virtually a full time task...), ferry kids around, do homework, meet with my friends at our knitting group once a week and generally plot and scheme what our next month will hold.

3. In what state do you live? Where were you born and raised?

Born and raised in sweet 'ol Gauteng, in South Africa. (For you folks across the big blue...Gauteng is one of South Africa's provinces /States).

4. Do you have children? If so, how many? If not, do you want them?

Yes! Two daughters aged 10 and 13. We absolutely adore them and probably spoil them far too much....it's a weakness :{ .......


5. Who is your favourite blogger to follow, and why?

Oh man, that's hard! If you take a look at my bloglist , you'll see quite a diversity in terms of type of blogs...I love the knitting and crocheting blogs, and I also enjoy the not so often listed kind of stuff, like the Marginal Revolution, and the Adventure blogs... I love antique jewellery, so I check in daily at The Three Graces :)

There is so much creativity and goodness out there, it's difficult to choose....


Right...so in a nutshell...there it is!

Tomorrow...a tutorial :)

Lo♥
Heidi :)

Tuesday, February 1, 2011

Eskimimi's fabulousness personified giveaway...


Ok, folks... some serious goodness to enjoy today...

One of my favourites: blogger/designer extraordinaire, and all round technically perfect knitter, Mimi, is having an amazing giveaway and offer on all her patterns. Needles afire! this girl's stuff is beautiful and her blog inspirational, so have a look... after all...she with the mostest stash wins...

Have a good one !
Lo♥
Heidi :)

Monday, January 31, 2011

Joburg on foot...


I needed to go into Johannesburg today, to finalize some admin that had been sitting on the back burner, and thought I would take some pics to show you all... I have had many requests to include some daily life details and a bit about South Africa, so here it is :)

I live in a town just outside of Johannesburg (which is locally referred to in short ...as "Joburg" by South Africans). Joburg is a really big place, ringed by a network of highways, which have recently (...and when I say recently...I mean it feels like forever, but in reality has been around 2 years) been undergoing an upgrading. This has resulted in the most awesome traffic issues, with lane closures, concrete barriers and the ever present long haul trucks blocking a lot of the flow of traffic. As a result, it is a seriously huge emotional undertaking to drive into Joburg in a car...and if at all possible, should be avoided.

But wait... not all is doom and gloom because ...(drum roll please...er...or rather Vuvusela blasts)...we now have the beginnings of a public transport system!!!!! Yes, I kid you not! The Gautrain is a newly built train that at this point , transports passengers from the Oliver Tambo International Airport, to Sandton, and back again. Sandton is a very up market area of Joburg, and also the business heart of the area. So, Yours Truly, drives to the nearest parking area, jumps on the Gautrain and withing 12 minutes...can walk through the heart of Sandton!

So, some pics...


Joburg is said to be one of the "greenest "cities, and everywhere you look , you will find mature trees, planted beddings and flowers. Businesses have gone to a lot of trouble to keep their garden bits well tended and thriving, and in this area (at least), the road is a pleasure to walk along.

In the pic on the right, are the much maligned "mini bus taxis". They congregate in what are termed "taxi ranks", and although (begrudgingly conceded...) a necessity, due to our non existent public transport system, they are the scourge on the roads of South Africa.

A South African mini bus taxi is the only object in the known universe, that can fly along a potholed excuse of a road, at Mach 2, and make a midair right angled turn, cross 5 lanes of peak hour traffic, to pick up a stray passenger, all while keeping only two of the four unroadworthy wheels in contact with terra firma. A South African mini bus taxi driver, is the only person in the known universe, who can control this beast , using a ratcheting spanner to manipulate the long sticky thingy that would normally hold a steering wheel, all the while eating a big mac with one hand and talking on his cell with the other...

Rules of the road are purely a figment of the collective imagination, and a mini bus meant to carry 15 passengers, with a bit of ingenuity and a strong arm, can easily be made to transport 40 people...

No, I do not lie, ask any South African.... the average South African commuter scoffs in the face of war, pestilence, famine, nuclear anihilation, and the sky falling on his head...he has been in a mini bus taxi... and has survived to ride again tomorrow....

...ask any South African...they will tell you :)


I walked from the Gautrain terminal to the place I had my appointment, taking the pics above on my merry way, and then went to the Nelson Mandela Square. This is essentially part of a shopping mall, with a large open air area where kids can run and play and parents and families sit and enjoy a meal. The main feature, is a massive bronze statue of Mr Nelson Mandela, and this is a huge tourist attraction, as was evidenced below, by the scores of people waiting to have their pic taken standing in front of the statue... Mr Mandela has been in hospital this past weekend, and I am pleased to say, the reports are that he is doing much better and is happy to be home :)


In the pic on the right, in the far distance, in front of the arched window, if you look closely, you can see the statue of Madiba. I spent a lovely hour browsing through all the books in Exclusive Books (a very, very well stocked chain of bookstores here in SA), and bought some beautiful books on the Renaissance (my oldest daughter is studying the Renaissance in history at the moment), and some ...yes , you guessed :) KNITTING books! Yeah baby! ...who needs food and water, shelter and clothing when you have the biggest stash and the biggest library!

On the crafting front, I have been knitting some fingerless mittens for my oldest daughter. If I can twist her arm to model for me, I will post some pics. I have also been doggedly working on the hexagon blanket for my little one. I must have been on another planet when I calculated that I would need 300 odd hexagons...it seems that the number is going to end up being closer to 600! I have been using Rowan's handknit cotton and I must confess...I didn't think it would be so heavy! Oh well...she is a big , strong girl...

Right, time to sign out...
Have a good one folks!
Lo♥
Heidi :)

Sunday, January 30, 2011

Hello again...


Hi everyone :)

After a very long absence...and with a fresh approach, I am blogging again :)
I will hopefully post something tomorrow...thank you to everyone who has been visiting .....much ♥♥♥ to you all!

Sleep tight,

Lots of Love
Heidi♥

Thursday, August 12, 2010

Stranding yarn...a first step into the mystery of Fair Isle...

Hello friends :) Today is still a slow amble through the sock knitting world, but with a small detour...as part of the way I knit socks, I am going to take you through a very basic technique for stranding one yarn behind another. In general terms, this is the same way you would strand yarns for Fair Isle style knitting.

In the last series of posts , you saw the different ways to knit the toe of the sock, depending on the type of fit you want. Once the full number of stitches needed for the sock were on your needles, you knitted in the round using the Magic Loop, until the sock measured approximately 2 inches shorter than your foot length. I would recommend that you try the sock on to see how far from your heel it is, and whether it feels comfortable. If you still have to yank at it to make it about 2 inches shorter than your foot length, then you need to knit some more rounds. It should fit comfortably snuggly (what a word combination!). Below is a pic of my sock, at the right length, and now I am preparing to start the heel.


I have decided to do things a little differently, in order to show you how to make different coloured heels and legs/cuffs. This is by no means necessary...if you want to have your sock in one colour of yarn, then just keep knitting the heels and cuffs without adding a new yarn. My sock has been knitted in a variegated rainbow yarn, but I want them to have red heels, so I need to start making the heel using a new yarn. In the pic below, you can see that I am ready to start a new round of knitting (my working yarn is on my back needle cable, and the back needle has been pulled out to the right , so that I can use it to start knitting the new round). Now would be the time to start knitting with the new yarn, but there's something else to consider...


The variegated yarn forms part of a stripy pattern, and it would be better to avoid cutting this yarn and joining the new red yarn to it via a knot. Why? Firstly, you want to try and make the overall pattern continue in a similar way around the foot, with minimal disruption of the different coloured stripe effect. In addition, I hate knots in a sock, so I find it better to weave the ends of yarns in rather than making knots and then weaving in the ends. The knot can make a hard uncomfortable bit rubbing against your shoe. But then how do you avoid making a knot and still keeping everything tensioned correctly? In this way...


The basic idea is to strand your unused (in this case the variegated rainbow yarn), to the correct starting place for continuing to knit the rest of the sock, after the heel is completed. Remember that the heel of the sock is knitted back and forth (not in the round), firstly making short rows, then "long"rows as you join the short rows /long rows up at the sides. So you will be knitting only on one side of the sock (to make the heel), while the other side (which forms the sock part over the front of your ankle/very top of your foot), lies dormant. However, you will need the variegated rainbow yarn to be in the position at the very edge of the heel knit, in order to turn your work around and start knitting in the round again, using a Magic Loop. When that happens, you will drop the red yarn, no longer needing it.

So what exactly is stranding one yarn behind another? This refers to the "catching"of an unused yarn between the used yarn and the knitted fabric, effectively trapping it between the two (used yarn and knitted fabric) and preventing it from being snagged by something and being pulled out to make the dreaded little pop out you so hate on your garments. Think of it as "tucking "your unused yarn into bed, snug between it's layers...

This stranding technique is most used in Fair Isle and Fair Isle style knitting, where two colours (or more in certain types on Fair Isle-like Knitting) are knitted alternating with one another in a set pattern. One obviously cannot cut and make a knot every time you have to change yarn colours, so you give each a turn to knit a stitch, then put them "to bed"temporarily, etc... there are many different thoughts on how often you should tuck the unused yarn behind the working yarn...everyone does it differently. I can't stand long floaty lengths of yarn behind my knitting, so I strand every second stitch. This makes the unused yarn lengths very short and virtually unsnagable. It does have the potential disadvantage that you need to stretch your knitting slightly at the end of the row, in order to give a little " ease" to the floating yarn as you are in essence laying it straight along the length of the row (albeit behind the working yarn), and therefore your knitting can end up less stretchy. But this doesn't apply to this situation with the sock as you will see later on.

When you practice this stranding technique, look at the video over and over, pause it at each step and make sure you know the order of the steps. With a bit of practice it will become second nature and you won't have to think anymore about what you are doing...

In the tutorial below, you are only stranding ONE yarn , the unused variegated rainbow yarn. In normal Fair Isle knitting the yarns would alternate.


Ok...because you will not make a knot , you will need to initially hold the tail end of the red yarn wrapped around your left hand fingers (to secure it temporarily). You will wrap the green yarn around your left hand little finger in exactly the same way you would wrap any yarn around your right hand little finger in regular knitting.

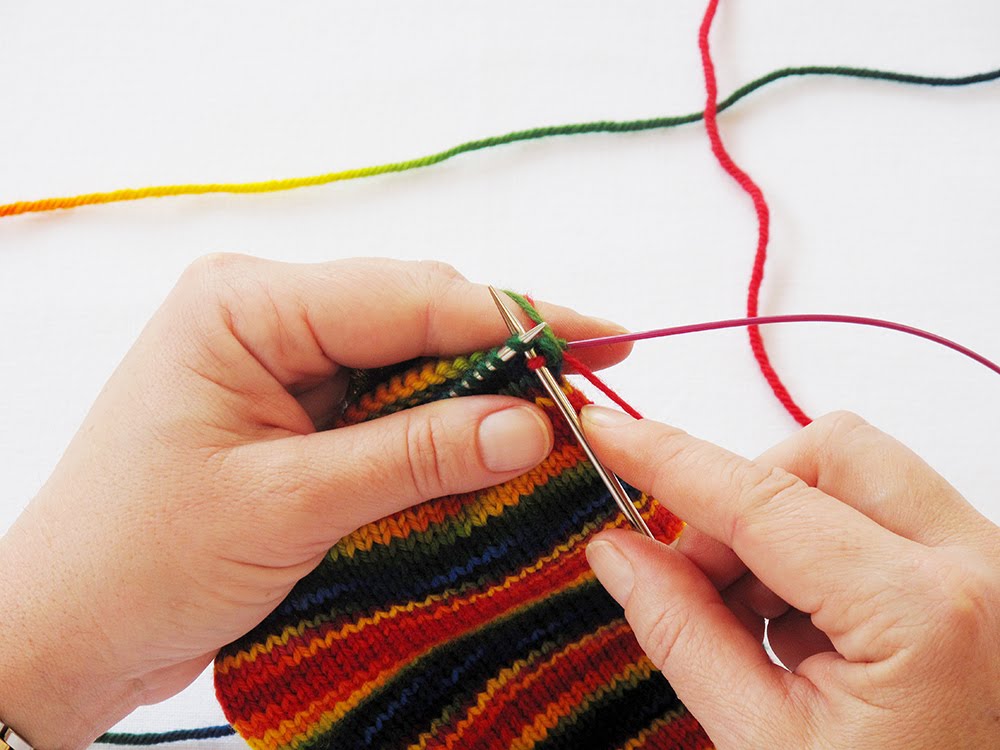
In the pic above, I am going to use the red yarn to form the stitches of the row (which will be the first row of the heel), and strand the unused green yarn behind the red yarn. Just remember that the green yarn is passive, it never forms a stitch, just lazes along ...

Insert your right hand needle into the first stitch on your left hand needle.


Slip your right hand needle under the green yarn. Keep the green yarn lying over the right hand needle.


Now slip the red yarn over the right hand needle...you can see above that they're buddies now...but the romance is about end...


The green yarn gets cold feet...slip the green yarn off the right hand needle, leaving the red yarn behind...


Pull the red yarn through, making on red stitch on your right hand needle. Not very much has happened yet, but wait and see the magic after the next step....


Right hand needle into next loop, and just use the red yarn to do a plain 'ol knit ...notice how the red yarn has "caught" the green yarn behind it.


The next stitch on your left hand needle will be the second time you want to do a yarn dance around the right hand needle...ie every second stitch you do the little dance to strand the green yarn...

So...needle in...


...green yarn across right hand needle...


...red yarn around right hand needle...


...green yarn absconds...


...red yarn moves on with it's life...makes a new stitch...


...needle in...


...red yarn knits...

Fourth stitch is a plain red yarn knit...catching the green yarn behind it... and so you continue along. If this seems difficult...please persevere, it will become easy once you have watched the video and practiced a bit...


In the pic above, I have stranded to the end of the row. If you enlarge this pic, by clicking on it, you can see the strand of the green yarn running behind the red stitches on the needle. When you've reached the end of the row, stretch your knitting a bit (don't yank the stitches off the needle by mistake!), to loosed the tension on the green yarn.


Tomorrow we start our short rows...and learn to do a wrap!
Hope you have a wonderful knitting evening!
Lots of Love,
Heidi :)


Tuesday, August 10, 2010

Alternative Sock Toes...

Hello my fellow sock knitters :) Today I am going to chat about the options to customize your sock toes. In the previous post, I knitted a sock toe that I like for my socks. I prefer a wider sock toe as I don't like feeling my toes squished together, but if your feet are different (narrower, toes more pointy etc), then you will want to change the shape of your sock toe...

As a quick aside note...there are countless ways to knit the toes of a sock, including Short Row toes, Star toe, as well as a bunch of provisional cast-on based toes... I don't use these , so I am not going to talk about them...suffice to say that my way is not the only way :)


If you look at the toe in the pic above, you'll see that the toe is broad and the width of knitting required for the foot (full number of stitches needed for the foot circumference), starts close to the point of the sock. This type of toe is good for people with broad +/- flat feet. Also, it's good for people who like room for their toes, whether they have broad feet or not. If you have worn a sock that has a bit of knitted fabric hanging off the point of your foot, then this would be the better alternative toe shape. This toe was the one from the previous post, where the increases were made on every row, first and last stitches of each side of a round.

What kind of toe would be good for people with very pointy feet?

The broad toe above would hang loose and wide on the foot that is narrower and perhaps pointier. The better alternative would be the shaped toe, seen below. Again, the same number of required stitches are cast-on, and then on the first round you just knit, next round increase first and last stitch (both sides of the round), then knit a round and so on. You are making the increases every alternate round, until you have the total required number of stitches for the foot. This results in a longer, sharper toe shape, which when pulled over your foot, will " hug" your toes :)


In addition, you have the option to knit toes that conform to the anatomical shape of the front of your foot. This would require a " half-half" series of increases, combining the two techniques explained above. It's easiest to read the increases on a chart (see below). Decide if you are knitting the right or left foot first. Remember that you will end up with mirror image toes, so don't get confused...do one at a time :) On one edge of the toe , you will increase every round, on the other, every alternate round and so on... this might work better for you if you prefer the shaping to be over your big and second toes, tapering sharply over the outside toes).


I have drawn a little schematic chart , illustrating these ideas. On the bottom left of the chart, you have the "alternate round" increase toe, on the right the "every round" increase toe (only one side of the knitting is shown). On the top, you have (again only one side shown), the left and right feet toes for the anatomically shaped toes. On the inside side, where the big toes are , the increases are made every round, and on the outside edge, every alternate round.

By changing the increase placement, you can shape the toes according to what works best for you...

A short post today...hope your socks are coming along nicely...

Lots of Love,
Heidi :)