Welcome to my Blog!

Hi there, nice to have you visiting! I'm Heidi and this is the blog for Heidi Bears. Here is where I post all the happenings in my work and daily life. Here and there you'll find info on things that have caught my attention as well as the odd tutorial. I hope you enjoy your visits. I love to have feedback, so leave me a comment!

Thursday, August 12, 2010

Stranding yarn...a first step into the mystery of Fair Isle...

Hello friends :) Today is still a slow amble through the sock knitting world, but with a small detour...as part of the way I knit socks, I am going to take you through a very basic technique for stranding one yarn behind another. In general terms, this is the same way you would strand yarns for Fair Isle style knitting.

In the last series of posts , you saw the different ways to knit the toe of the sock, depending on the type of fit you want. Once the full number of stitches needed for the sock were on your needles, you knitted in the round using the Magic Loop, until the sock measured approximately 2 inches shorter than your foot length. I would recommend that you try the sock on to see how far from your heel it is, and whether it feels comfortable. If you still have to yank at it to make it about 2 inches shorter than your foot length, then you need to knit some more rounds. It should fit comfortably snuggly (what a word combination!). Below is a pic of my sock, at the right length, and now I am preparing to start the heel.


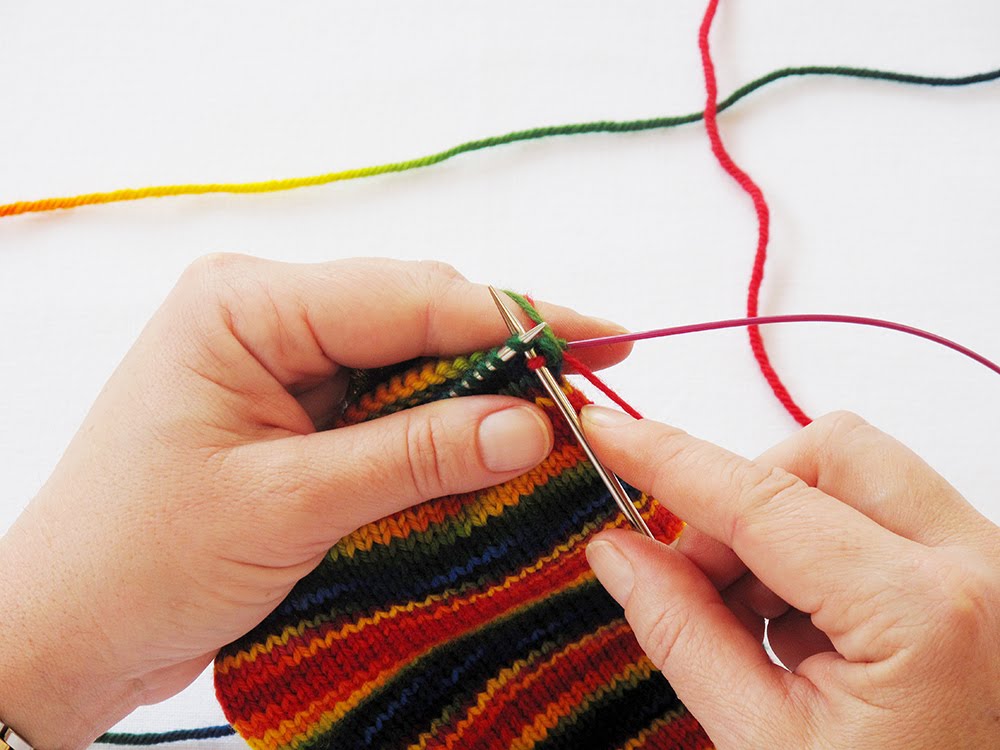
I have decided to do things a little differently, in order to show you how to make different coloured heels and legs/cuffs. This is by no means necessary...if you want to have your sock in one colour of yarn, then just keep knitting the heels and cuffs without adding a new yarn. My sock has been knitted in a variegated rainbow yarn, but I want them to have red heels, so I need to start making the heel using a new yarn. In the pic below, you can see that I am ready to start a new round of knitting (my working yarn is on my back needle cable, and the back needle has been pulled out to the right , so that I can use it to start knitting the new round). Now would be the time to start knitting with the new yarn, but there's something else to consider...


The variegated yarn forms part of a stripy pattern, and it would be better to avoid cutting this yarn and joining the new red yarn to it via a knot. Why? Firstly, you want to try and make the overall pattern continue in a similar way around the foot, with minimal disruption of the different coloured stripe effect. In addition, I hate knots in a sock, so I find it better to weave the ends of yarns in rather than making knots and then weaving in the ends. The knot can make a hard uncomfortable bit rubbing against your shoe. But then how do you avoid making a knot and still keeping everything tensioned correctly? In this way...


The basic idea is to strand your unused (in this case the variegated rainbow yarn), to the correct starting place for continuing to knit the rest of the sock, after the heel is completed. Remember that the heel of the sock is knitted back and forth (not in the round), firstly making short rows, then "long"rows as you join the short rows /long rows up at the sides. So you will be knitting only on one side of the sock (to make the heel), while the other side (which forms the sock part over the front of your ankle/very top of your foot), lies dormant. However, you will need the variegated rainbow yarn to be in the position at the very edge of the heel knit, in order to turn your work around and start knitting in the round again, using a Magic Loop. When that happens, you will drop the red yarn, no longer needing it.

So what exactly is stranding one yarn behind another? This refers to the "catching"of an unused yarn between the used yarn and the knitted fabric, effectively trapping it between the two (used yarn and knitted fabric) and preventing it from being snagged by something and being pulled out to make the dreaded little pop out you so hate on your garments. Think of it as "tucking "your unused yarn into bed, snug between it's layers...

This stranding technique is most used in Fair Isle and Fair Isle style knitting, where two colours (or more in certain types on Fair Isle-like Knitting) are knitted alternating with one another in a set pattern. One obviously cannot cut and make a knot every time you have to change yarn colours, so you give each a turn to knit a stitch, then put them "to bed"temporarily, etc... there are many different thoughts on how often you should tuck the unused yarn behind the working yarn...everyone does it differently. I can't stand long floaty lengths of yarn behind my knitting, so I strand every second stitch. This makes the unused yarn lengths very short and virtually unsnagable. It does have the potential disadvantage that you need to stretch your knitting slightly at the end of the row, in order to give a little " ease" to the floating yarn as you are in essence laying it straight along the length of the row (albeit behind the working yarn), and therefore your knitting can end up less stretchy. But this doesn't apply to this situation with the sock as you will see later on.

When you practice this stranding technique, look at the video over and over, pause it at each step and make sure you know the order of the steps. With a bit of practice it will become second nature and you won't have to think anymore about what you are doing...

In the tutorial below, you are only stranding ONE yarn , the unused variegated rainbow yarn. In normal Fair Isle knitting the yarns would alternate.


Ok...because you will not make a knot , you will need to initially hold the tail end of the red yarn wrapped around your left hand fingers (to secure it temporarily). You will wrap the green yarn around your left hand little finger in exactly the same way you would wrap any yarn around your right hand little finger in regular knitting.

In the pic above, I am going to use the red yarn to form the stitches of the row (which will be the first row of the heel), and strand the unused green yarn behind the red yarn. Just remember that the green yarn is passive, it never forms a stitch, just lazes along ...

Insert your right hand needle into the first stitch on your left hand needle.


Slip your right hand needle under the green yarn. Keep the green yarn lying over the right hand needle.


Now slip the red yarn over the right hand needle...you can see above that they're buddies now...but the romance is about end...


The green yarn gets cold feet...slip the green yarn off the right hand needle, leaving the red yarn behind...


Pull the red yarn through, making on red stitch on your right hand needle. Not very much has happened yet, but wait and see the magic after the next step....


Right hand needle into next loop, and just use the red yarn to do a plain 'ol knit ...notice how the red yarn has "caught" the green yarn behind it.


The next stitch on your left hand needle will be the second time you want to do a yarn dance around the right hand needle...ie every second stitch you do the little dance to strand the green yarn...

So...needle in...


...green yarn across right hand needle...


...red yarn around right hand needle...


...green yarn absconds...


...red yarn moves on with it's life...makes a new stitch...


...needle in...


...red yarn knits...

Fourth stitch is a plain red yarn knit...catching the green yarn behind it... and so you continue along. If this seems difficult...please persevere, it will become easy once you have watched the video and practiced a bit...


In the pic above, I have stranded to the end of the row. If you enlarge this pic, by clicking on it, you can see the strand of the green yarn running behind the red stitches on the needle. When you've reached the end of the row, stretch your knitting a bit (don't yank the stitches off the needle by mistake!), to loosed the tension on the green yarn.


Tomorrow we start our short rows...and learn to do a wrap!
Hope you have a wonderful knitting evening!
Lots of Love,
Heidi :)


Tuesday, August 10, 2010

Alternative Sock Toes...

Hello my fellow sock knitters :) Today I am going to chat about the options to customize your sock toes. In the previous post, I knitted a sock toe that I like for my socks. I prefer a wider sock toe as I don't like feeling my toes squished together, but if your feet are different (narrower, toes more pointy etc), then you will want to change the shape of your sock toe...

As a quick aside note...there are countless ways to knit the toes of a sock, including Short Row toes, Star toe, as well as a bunch of provisional cast-on based toes... I don't use these , so I am not going to talk about them...suffice to say that my way is not the only way :)


If you look at the toe in the pic above, you'll see that the toe is broad and the width of knitting required for the foot (full number of stitches needed for the foot circumference), starts close to the point of the sock. This type of toe is good for people with broad +/- flat feet. Also, it's good for people who like room for their toes, whether they have broad feet or not. If you have worn a sock that has a bit of knitted fabric hanging off the point of your foot, then this would be the better alternative toe shape. This toe was the one from the previous post, where the increases were made on every row, first and last stitches of each side of a round.

What kind of toe would be good for people with very pointy feet?

The broad toe above would hang loose and wide on the foot that is narrower and perhaps pointier. The better alternative would be the shaped toe, seen below. Again, the same number of required stitches are cast-on, and then on the first round you just knit, next round increase first and last stitch (both sides of the round), then knit a round and so on. You are making the increases every alternate round, until you have the total required number of stitches for the foot. This results in a longer, sharper toe shape, which when pulled over your foot, will " hug" your toes :)


In addition, you have the option to knit toes that conform to the anatomical shape of the front of your foot. This would require a " half-half" series of increases, combining the two techniques explained above. It's easiest to read the increases on a chart (see below). Decide if you are knitting the right or left foot first. Remember that you will end up with mirror image toes, so don't get confused...do one at a time :) On one edge of the toe , you will increase every round, on the other, every alternate round and so on... this might work better for you if you prefer the shaping to be over your big and second toes, tapering sharply over the outside toes).


I have drawn a little schematic chart , illustrating these ideas. On the bottom left of the chart, you have the "alternate round" increase toe, on the right the "every round" increase toe (only one side of the knitting is shown). On the top, you have (again only one side shown), the left and right feet toes for the anatomically shaped toes. On the inside side, where the big toes are , the increases are made every round, and on the outside edge, every alternate round.

By changing the increase placement, you can shape the toes according to what works best for you...

A short post today...hope your socks are coming along nicely...

Lots of Love,
Heidi :)

Sunday, August 8, 2010

The Sock Toe...a journey begins!

Hi everyone! Finally...the journey begins...today I am doing a tutorial on how to knit the toe part of your basic sock... you have worked out your sock pattern , based on the measurements you took of your foot earlier this week. Just to re-iterate, it is essential that you know how to do Judy's Magic cast on, as well as Magic Loop knitting...
I am starting the series of tutorials with how to knit one sock on a Magic Loop, ie ONE circular needle. If you have never knitted a sock before, it would be a good idea to cope with one sock initially, until you have the technique down pat, then progress to two socks on one needle.

Be sure that you have a circular needle that is at least 32 inches long (if possible a 40 inch length is even better), or you may struggle with keeping your " loop" between the sides of your knitting.


Ok, start by casting on the required number of stitches onto your circular needle. Remember, that your number of stitches may be different to mine...don't fret...just keep the principles in mind... I needed 14 stitches , which are divided over the two needles as seen above (7 stitches on each needle). Ideally, I would want to start with an even number of stitches on each needle, so could have upped the number to 8 (ie a total of 16 stitches), but I wanted to show you that one stitch is not a crisis...we'll increase to an even number when we increase for the toe.

So...you will start to do the increases for the toe immediately, straight onto the cast on stitches. This is a little different from how some people teach this, but I prefer to do it this way, as I find it makes a nice even slope to the toe edge, and doesn't make a funny little bump at the toe tip edge.

The increase will take the form of a " kfb" . If you are relatively new to knitting, you may not have come across this term. It stands for " knit front and back ", and is a very easy way to make an increase in your knitting. By knitting into the front and into the back of a stitch, you are making ONE extra stitch, so if you have 10 stitches on your needle, and you do one kfb, you will have 11 stitches in total, after you finished the kfb.
Let's walk through it...

In the pic above, you have the "knit" side facing you, and you have inserted the right hand needle into the first stitch.


Yarn around the tip of the right hand needle (just as you would do for a regular knit stitch). Pull through...BUT DON'T drop the loop off of the left hand needle.


Insert the right hand needle into the back of the loop that is still left on the left hand needle. In the pic above , you can see the turquoise arrow indicating the direction of your right hand needle's path, into the back of the red stitch (red arrow).


Above, you can see the right hand needle is now placed through the back of the red loop...now you loop your yarn around it in exactly the way you would for a regular knit stitch. (see below)


Pull the yarn through, and now you can drop the red loop on the left hand needle ( just as for a regular knit stitch). You created a new stitch !


Kfb is completed.


Continue to knit across until you have one stitch left on your left hand needle. You will repeat the kfb as before, increasing into the last stitch on this side of your work.


Ok, so in total you now have 9 stitches on your needle, because you have done two kfb's. Turn your work around and repeat the procedure above on the second side of your knitting. When you have completed round 1 , you have a total of 4 stitches extra.

Continue in this way, increasing into the first and last stitch of each side of your knitting, until you have the total required number of stitches for your sock.


Remember that I had an odd number of stitches to start with , on each needle when I did my cast on...so at the point above (where I have 27 stitches on each needle), if I do an increase into the first and last stitch of each side , I am going to end up with two stitches more in total, than I actually need. If you started with an odd number of cast on stitches, keep increasing until you are just two stitches short of your required total. Then ONLY increase into the first and last stitch OF THE ROUND. I have indicated these stitches in the pic above, by red arrows. Remember that a ROUND of magic loop knitting includes knitting BOTH sides of your work, so the first and last stitches of a round are on different needles.

This added increase will not affect your toe fit at all, and you will have the proper amount of stitches for your sock.


If you look closely at the pic above, you will see that each time I did a kfb, a little "purl-like" bump was made at the base of the increase. This is a nice way to tell where the increase is. Other methods of increasing can look different, so it is quite easy to spot a kfb increase.


Now that you have the total required number of stitches on your needles (half on one needle, half on the other), you will continue to knit in the round...on and on...until the length of your sock is about 2 inches shorter than to the back of your heel. Measure the sock on your foot as you go along. Just be careful that you don't " undo" your magic loop, by pulling the cable all the way through :)

I have so enjoyed posting these tutorials and knitting with this yarn...can't wait to show you how to turn a heel.... :D

Let me know if there any questions...email me at the following address:
heidibearscreativeblog@gmail.com

That's all for today!
Have a great movie night! (wonder what's showing tonight at 8pm?...will run off to look ;) )
Lots of Love
Heidi :)

Friday, August 6, 2010

Designing a basic sock...Part 2

Welcome to the second part of designing a basic knitted sock! I hope that you are feeling a bit less daunted by the prospect , and are going to have a go at knitting your first sock :) . I am also going to answer a question about the beginning round of Magic Loop knitting. So here goes...


In the last post, you had measured your foot circumference and worked out your stitch gauge. You are now going to work out how many stitches you will need to knit your basic "tube", in order for it to fit comfortably.
Using your calculator (or if you happen to be a math genius...work it out in your head ;) ), subtract 10% of the circumference measurement of the ball of your foot, from the total measurement. So in my example, my foot circumference was 9 and 3/4 inches. 10% is equal to 0.975in, so my math will look as follows:


Since I have 6 and a half stitches in an inch for my gauge, I need to multiply 6.5 stitches, by 8.775in (the needed inch circumference of my foot). This gives me 57.04 stitches, which of course
is not possible, so I have to round this number to 57 stitches.

However, you want to have an even number of stitches , so that you can do a Judy's cast-on, so you have a choice...either round UP to 58 stsitches, or DOWN to 56 stitches. I am going to (arbitrarily), round down to 56 stitches for these sock posts.Right....you have determined how many stitches you need for the sock, but obviously you need to START your sock with fewer stitches...to make the toe. So, how many stitches are you going to cast on? A very general rule is to use ONE QUARTER the total number of stitches required for the sock, as the cast on number of stitches to make the toe.
So, if you need 56 sts in total for your sock, one quarter is 14 sts. Remember that you are going to use Judy's Magic cast-on, and this means that your 14 stitches are evenly cast on over the two needles....therefore you will end up with 7 stitches on each needle.

So lets recap...

Total number of stitches needed to knit the sock = 56sts
Number of stitches needed for the toe cast-on = 14 sts
(you will have half on one needle, and half on the other)
For this KAL, I am using a DK weight yarn, so I have relatively fewer stitches per inch than say someone who is knitting with proper sock yarn (will probably have somewhere between 8 and 10 stitches per inch for gauge). Remember, the formula....don't be concerned if your gauge doesn't match mine. Follow the steps above, and even if your results are different...your sock will still be right for you!

Tomorrow, we'll cast on and do the toe increases...so whip out your measuring tape and start your calculations :)

Magic Loop Revisited...


I wanted to do a quick recap of the first round of the Magic Loop knitting. You will use Judy's Magic Cast-On as the basis for the first round.


When you have cast on the required number of stitches, your needles will still be pointing to the left hand side. Remember to bring your tail yarn towards you and to the right across the working yarn.

Keeping your tail yarn in this position, rotate your needles clockwise to your right.


The pic above is what your work should look like...Now if you look closely, the side of the cast on facing you is actually the knit side....no purly bumps seen...


If you twist your needles over you'll see the purly side with little bumps...remember that the purl side will eventually be on the "inside" of your work as you knit in the round, and all the lovely knit stitches will be facing you (because you are just making "knit"stitches all the time...)


Remember that the needle that the working yarn (the yarn that comes from the ball of yarn) is coming from, is the needle that will be pulled to your right , being the one you use to start your knitting with. Once you have knitted several rounds, a little "pocket" will start to form, with all the purl stitches facing in and all the knit stitches facing out. But...at the beginning of your first round, you haven't yet gotten "sides"of knitted fabric to form the little pocket, so all you have, to guide you as to where you will insert your right hand needle, is the look of the cast on stitches, ie the "knit"vs "purl" sides, as seen above...

In order to insert your right side needle into the "knit" side of your first stitch, you will need to slightly twist your work , so that you are looking square onto the "knit " side of your cast on.


Things should look like the pic above...


Here, in the pic above, I have now knitted two stitches, and you can see that the "knit" side of the cast on is still facing me.

Once you have done enough rounds to form the pocket of knitting , it will be obvious where you need to knit into...but in the first few rounds it may be a little confusing, so just walk through the pics above step by step...if you start seeing purl and knit stitches on the SAME side of the fabric, you have gone wrong somewhere...

I hope that makes things a little clearer...

Have a good evening folks!
Lots of Love,
Heidi :)

Wednesday, August 4, 2010

Designing a basic sock...Part 1

Hi all my blogfriends! I finally got a moment to blog...not that I have been snowed under by quests tedious and draining...au contraire! Our knitting group decided to do a travel-get-together today, to test out and become familiar with the new Gautrain here in Johannesburg. Now, for all the readers who do not live here in South Africa, you may not have heard of this new-fangled thing... we have a veritable fledgling public transport system now!!!!! It may seem like nothing to be very excited about....but, when you realize that there is no safe, affordable public transport at all in South Africa, then truly this is a wonderful thing! The Gautrain was fabulous :) Clean, safe, efficient, on time (!) and comfortable and user friendly....I mean, what can one ask for more than that? We went to a local bookshop, ate cake, chatted (and it must be said...I actually did do some knitting!), bought some beautiful books...and came home happy and amazed! Well done to the Gautrain people! And now onto the blogpost...how to design a basic sock for yourself...

Requirements

Obviously...your foot
A tape measure
Pins
A knitted gauge swatch in your chosen yarn and stitch of choice (I am going to do a basic, stocking stitch sock pattern to start with...)
Note pad and pen
Calculator
Ruler with inch/cm lines


Ok, lets start at the beginning...

What is a sock really? If you break down the fancy patterns, stitches, different toes, heels, cuffs, and so on, what you have is a tube with a little sticky-outy bit for the heel. This is wonderful, because if you've looked at your foot lately, it isn't really much of a tube at all. And yet, if the tube is appropriately sized, and the sticky-outy bit for the heel is the correct size...it fits! So....if you can design a knitted tube with a closed end, that fits the circumference of your foot well, all you need to add is the heel bit, which wonderfully, will be determined in part by the very number of stitches you use to knit the tube! Ok, I know that there may be people out there (perhaps like Shrek...), who have feet that may be a little different in proportion...I am merely attempting to explain how to make a sock for a normal, average person's foot... :)

An ideal sock is seamless, with no lumpy bits that make wearing them uncomfortable, so knitting them in the round is ideal. I know that there are people who knit socks flat and then seam them up, but when you see how easy it is to knit them in the round on a Magic Loop, you'll never knit them flat again!

Yarn and needles

There are obviously endless possibilities in choosing a yarn for your socks. That being said, it is generally a good idea to stick to sock weight yarn, or a double knit weight (or something in between...) If you are seriously intent on creating your life's work sock wise...by all means use a lace weight...but if you actually want to end up wearing your socks some time this century, choose a yarn that will knit up relatively fast. The yarn manufacturers will give you some indication on the ball band, what size needles to knit on. This recommendation is not terribly helpful (in my opinion...), when it comes to knitting socks. In reality, needle size is not that critical...how it feels and looks when you've knitted a swatch, is more important.

Let's discuss an example...

I am going to be using a DK weight yarn (100% superwash merino) for the sock demos in the subsequent posts. The general indication would be to knit this on needles ranging from 4-5mm. I knitted a swatch on size 4.5mm needles, and found that the resulting fabric was too loosely made and hole-yish (?is that even a word)...it wouldn't be snug and warm. When I knitted a swatch on size 3mm needles, the fabric density was perfect. So, play around with some swatches (they really don't take that long to knit...), until you are happy with the way the knitting feels and looks. I am only referring to a stocking stitch socks folks...obviously a fragile, pretty lace designed sock is going to be loose and hole-yish... :)

Right...yarn and needles chosen... now to start with the real work...

Because you are knitting the sock from the toe up, you are able to periodically measure the sock on your foot, and by how it fits, decide if your tube is long enough. So in reality, the length of your foot is only critical in determining if you have enough yarn for your project, however I will walk you through the process... ( If you are knitting a sock for someone who hasn't handily left their foot in your keep, you will have to take into account the length of the recipients foot.)

Firstly, measure your foot around the widest part of it...this will generally be around the ball of your foot. Secondly, you need to measure the length of your foot. Stand with your heels against the wall, and ask someone to place their finger at the tip of your big toe. Note the point, and measure the distance from the wall to that point. (If your big toe is not the longest toe in your foot, mark the point in front of the longest toe). Measuring your foot with a ruler while contorting your leg into an unnatural backward bend, is certainly going to give you an erroneous result ;)

Ok, you have your two measurements... now subtract 10% from each...this is to allow for so called "negative ease"...which really means that you want your sock to "hug" your foot, and to achieve that , you need to have a sock that is slightly smaller than the actual measurements of your foot. This is the reason why is is advisable to knit the sock in a yarn with some elasticity (or springyness)...wool is probably the best or if you are allergic to wool, a cotton/bamboo/linen etc that has some elastic type addition to it. If your ankle is a lot bigger than your foot circumference, you must measure this as well. You will need to increase the number of stitches you have as you get to the leg portion of your sock, or it will not go over ....

It's a good idea to keep a small notebook with details of your sock...note the yarn brand, yarn weight, needle size you've decided will work best for your sock, as well as your foot measurements.


Swatching

Yes, the dreaded word.... this is really important...trust me it will take a lot less time to knit the swatch and work with accurate measurements, than it will take to frog two socks and re-knit them (by which time you will probably never want to see a sock again!)

You have got to make a gauge swatch, folks!!!! Because the actual row gauge(the number of rows you have in an inch) is not as critical as the stitch gauge (the number of stitches in an inch), I tend to knit a swatch that is wider than it is long. In an ideal world, one should gently steam and block the swatch...but since life is too short, I just make sure that the work is on my cable rather than the needle (this allows the swatch to "relax" and contract to it's natural wannabe state...), and then measure my number of stitches in an inch. In the pic below I have indicated the stitches in a red "v". If you look at the stitches between the pins indicating the inch, you will see 6 and a half stitches. The half stitch is actually important, so don't fudge it at this point...count the half...


Ok, to recap...

-Choose your yarn
-Using needles slightly smaller than the recommended needle size on the yarn ball band, knit a swatch to see if you like the density/look of the knitted fabric
-Measure your foot length, and the width at the widest part of your foot (usually the ball of your foot), and if necessary, the ankle/leg width
-Determine your stitch gauge by measuring the number of stitches in an inch of your swatch
-Write it all down...you will need them for the next post....

If there are any things you are uncertain about in this post...please sen me a mail...I will try to clarify... :)

Have a great evening,
Lots of Love,
Heidi :)