
Hello friends :)
Today I am doing a tutorial on the African Flower Crochet hexagon.I recently joined a Ravelry group swap, and really have enjoyed making these hexagons...so I thought I would share a tutorial! This pattern was originally published in a South African magazine, and the designers are Lounette Fourie and Anita Roussouw.
Hola Amigas :)
Hoy, realizaré una tutoría para la elaboración del Crochet de una Flor Africana Hexagonal. Recientemente, me he unido a un grupo de intercambio Ravelry, y he disfrutado plenamente confeccionar estos hexágonos… por eso ¡he decidido compartir mis conocimientos con ustedes! Estos patrones se publicaron originalmente en una revista sudafricana, y las diseñadoras son Lounette Fourie y Anita Roussouw.
Hej venner :)I dag vil jeg lave en vejledning til African Flower sekskanten. For nyligt deltog jeg i en Ravelry bytte-gruppe og har virkelig hygget mig med at lave disse sekskanter... så derfor har jeg besluttet mig for at lave en vejledning. Dette mønster blev oprindeligt udgivet i et sydafrikansk magasin og designerne er Lounette Fourie og Anita Roussouw.

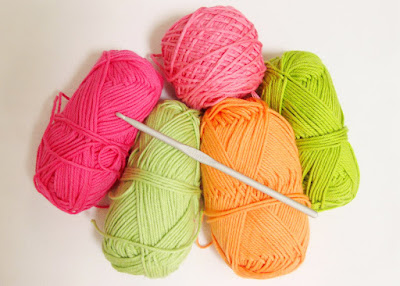
You will need several colours of yarn and a size 5mm crochet hook.
Necesitarás hilos de varios colores y una aguja de crochet de 5mm.
Du skal bruge flere forskellige farver garn og en 5 mm. hæklenål.
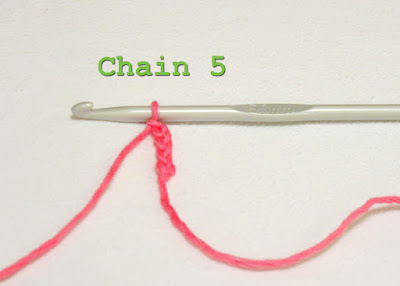 Start by making a slip knot, and make 5 chain stitches.
Empieza haciendo un nudo corredizo y realiza 5 puntos cadena.
Start med 5 luftmasker.
 Slip stitch into the first chain, to make a ring. If you are not sure how to do this, please look at this post.
Haz un punto enano en la primera cadena para formar un anillo. Si no estás segura de cómo hacerlo, por favor mira este post.
Saml til en ring med en kædemaske.
 Chain 3 (this will form the first dc).
Cadena 3 (esto formará el primer punto alto o vareta).
Hækl 3 luftmasker (de vil udgøre den første stangmaske).
 Make a dc into the ring. Your work should look like the pic above.
Hækl en stangmaske ind i ringen (dit arbejde skal se ud som billedet herover).
 Chain 1.
Cadena 1.
Hækl 1 luftmaske.
 Make 2 dc into the ring. You should now have 4 dc's separated by a chain stitch.
Haz 2 puntos altos en el anillo. Ahora deberías tener 4 puntos altos separados por una cadeneta.
Hækl to stangmasker ind i ringen. Du skal nu gerne have 4 stangmasker med en luftmaske imellem).
 Repeat, until you have six x (2dc, ch,2dc) sets.
Repite el proceso hasta tener seis series de puntos de cruz (2 puntos altos, punto cadena, 2 puntos altos).
Gentag indtil du har 6 par stangmasker (2 stangmasker, en luftmaske, 2 stangmasker).
 Slip stitch into the third chain of your initial 3chain, made at the beginning of the round.
Haz un punto enano en la tercera cadena de tu cadena 3 inicial, hecha al inicio de la vuelta.
Saml med en kædemaske i den tredje maske på den stangmaske der startede omgangen.
 Cut yarn, join a new colour.
Corta el hilo, agrega un color nuevo.
Klip garnet og start på en ny farve.
 Insert hook into the space just to the right of the 3ch leg from the previous round. Yarn around hook, pull yarn through, ch3.
Introduce la aguja en el espacio que está a la derecha de los 3 puntos cadena de la vuelta anterior. Con el hilo alrededor de la aguja, jálalo a través de los 3 puntos cadena.
Placer hæklenålen til højre for de 3 luftmasker fra forrige omgang. Slå garnet om nålen og lav 3 luftmasker.
 1dc into the same space.
Hækl en stangmaske i samme mellemrum.
 Ch1 and the make 2dc into the same space again. Your work should look like the pic above.
Haz 1 punto cadena y luego realiza 2 puntos altos en el mismo espacio nuevamente. Tu trabajo debe ser similar a la fotografía de arriba.
Hækl en luftmaske og derefter 2 stangmasker i samme mellemrum (dit arbejde skal se ud som billedet herover).
 Repeat the previous steps into the next chain space from the previous round, as seen above.
Fortsæt forrige trin i næste mellemrum fra forrige runde, som det ses på billedet herover.
 Continue with these repeats until you have six sets of 2dc,ch1,2dc.
Continúa con la repetición de estos pasos hasta tener una serie de 2 puntos altos, 1 punto cadena, 2 puntos altos.
Fortsæt indtil du har 6 par (2stangmasker, 1 luftmaske, 2 stangmasker).
 Join to the third chain stitch with a slip stitch, to close the round.
Une al tercer punto cadena con un punto enano para completar el círculo.
Afslut omgangen med en kædemaske i den tredje maske på den stangmaske der startede omgangen.
 Insert your hook into the space created by the chain stitch between the 2dc 's, as seen above.
Introduce la aguja en el espacio creado por el punto cadena entre los 2 puntos altos, ver arriba.
Placér nålen i det mellemrum der er skabt mellem de to stangmasker fra forrige omgang, som det ses herover. Slå garnet om nålen og træk igennem i en bevægelse (kædemaske).
 Round joined...
Vuelta completa.
Omgangen er nu hæftet.
 Chain 3. This again is taking the place of the first dc, and you count it as 1 dc stitch.
Cadena 3. Nuevamente, esto toma el lugar del primer punto alto, y lo consideras como 1 punto alto.
Hækl 3 luftmasker, som igen udgør den første stangmaske (dvs. at den tælles som én stangmaske).
 Make 6 further dc into the same space. There should be 7 dc's...
Haz 6 puntos altos adicionales en el mismo espacio. Debe haber 7 puntos altos…
Hækl yderligere 6 stangmasker i samme mellemrum, så der i alt er 7 stangmasker
 Repeat the same into each space, as above.
Repite el mismo procedimiento en cada espacio, como se muestra arriba.
Fortsæt sådan i hvert mellemrum, som herover
 Join round by slip stitch (getting the hang of this :) )
Cierra el círculo con un punto enano (vamos dominando el proceso :) )
Afslut omgangen med en kædemaske i den tredje maske på den stangmaske som startede omgangen
 Cut yarn, and join new colour.
Corta el hilo, y agrega un color nuevo.
Klip garnet og start på en ny farve.
 Insert hook into the first chain stitch space, yarn around hook, pull yarn through. Yarn around hook again, pull through the stitch on the hook.
Introduce la aguja en el espacio de la primera cadena de puntos, jala el hilo de la aguja. Con el hilo en la aguja nuevamente, jálalo a través del punto en la aguja.
Placér nålen i det første mellemrum mellem to stangmasker, slå garnet om nålen og træk igennem, så garnet om nålen igen og træk igennem masken på nålen.
 You have made the first sc into the first chain loop.
Haz realizado el primer punto bajo en la primera cadena de hebras.
Du har nu lavet den første fastmaske i din ”kædebue”
 Repeat 6 times more (sc into every successive chain loop, until there are 7 sc in total).
Repite el proceso 6 veces más (punto bajo en cada hebra sucesiva de la cadena, hasta que haya 7 puntos bajos en total).
Fortsæt seks gange (hækl 6 fastmasker mere, så der i alt er 7 fastmasker).
 You will now do a dc , into the 3rd round space as seen in the pic.This will make a very long dc stitch, but will help to shape the flower petal.
Ahora, realiza un punto alto en el espacio de la tercera vuelta, tal como se muestra en la fotografía. Esto producirá un punto alto muy largo, pero ayudará a dar la forma de pétalo de una flor.
Nu skal du lave en stangmaske i tredje rundes mellemrum, som det ses på billedet. Det vil blive en meget lang stangmaske, som er med til at forme blomstens kronblad. Sørg for at stramme stangmasken godt op, men ikke for stramt så blomsten rynker sammen
 Continue to work you way around the hexagon...7sc, dc, 7sc, dc etc, until you get back to the beginning...as always, join the round by slip stitch into the first sc.
Continúa trabajando alrededor del hexágono…7 puntos bajos, punto bajo, 7 puntos bajos, punto bajo, etc., hasta que vuelvas al inicio… como es habitual, cierra el círculo con un punto enano en el primer punto bajo.
Fortsæt arbejdet rundt om sekskanten (7 fastmasker, 1 stangmaske, 7 fastmasker osv. indtil du er nået hele vejen rundt til hvor du startede). Afslut som altid omgangen med en kædemaske i første fastmaske.
 Cut yarn and join a new colour.
Corta el hilo y agrega un color nuevo.
Klip garnet og start på en ny farve.
 Chain 3.
Cadena 3.
Hækl 3 luftmasker
 Dc into the next loop of the sc you made in the previous round. Repeat until you have 4dc made.
Haz un punto alto en las hebras del punto bajo que hiciste en la vuelta anterior. Repite el proceso hasta que hayas hecho 4 puntos altos.
Hækl en stangmaske i fastmasken fra forrige omgang. Fortsæt indtil du har 4 stangmasker.
 You will now have reached the middle of the top of the flower petal. Ch1, then make another dc into the same space as the previous dc. It is this chain that helps to form the hexagon shape.
En esta instancia, has llegado a la mitad de la parte superior del pétalo de la flor. Haz 1 punto cadena, luego haz otro punto alto en el mismo espacio que el punto alto anterior. Es esta cadena la que ayuda a formar la figura del hexágono.
Du har nu nået midten af toppen af kronbladet. Hækl en luftmaske og hækl derefter en stangmaske i den samme maske som den forrige stangmaske. Det er denne maske der er med til at give sekskanten sin form.
 I have marked the middle stitch with a pink dot, so that you can clearly see where the dc,ch,dc has to be made, over each petal. Work your way around the hexagon, working in the above pattern.
He marcado la zona media con un punto rosado, de manera a que puedas ver claramente donde se deben realizar el punto alto, el punto cadena y el punto alto sobre cada pétalo. Continúa trabajando alrededor del hexágono, utilizando el patrón de arriba.
Jeg har markeret midtermasken med en lyserød prik, så du tydeligt kan se, hvor stangmaske, luftmaske, stangmaske skal være over hvert kronblad. Arbejd dig rundt om sekskanten ved at bruge det herover forklarede mønster .
 Join the last dc to the 3rd chain of the beginning leg, as in the previous rounds.
Une el último punto alto a la tercera cadena del inicio de la serie, como en las vueltas anteriores.
Afslut omgangen med en kædemaske i øverste maske af denne omgangs første stangmaske, som i de tidligere omgange.
 If you prefer, you can add another round in a different colour. This extra round is worked in exactly the same way as the previous round, again making a dc,ch1,dc, over the middle of the petal...
Si prefieres, puedes agregar una vuelta adicional en un color diferente. Se trabaja de la misma manera como en las vueltas anteriores, haciendo punto alto, 1 punto cadena, punto alto en el medio del pétalo…Espero que esto te sea de utilidad…
¡Que tengas un excelente día!
Con mucho Amor,
Heidi :)Hvis du har lyst, kan du tilføje en omgang mere i en anden farve. Denne omgang laves efter præcis samme opskrift som den forrige omgang (stangmaske, luftmaske, stangmaske over toppen af blomstens kronblad).
Håber det giver mening...
Hav en skøn aften!
Mange kærlige hilsner
Heidi :)

172 comments:
My dear friend, this is such a beautiful tutorial! I love the colours and the flowers, they are amazing:) See you at knitting group tomorrow:)
Love
Linda
Heidi my friend - you are amazing! I'm going to give that a try - after the knitted ones:)
FANTASTIC! Thanks so much! I've been drooling over all the beautiful african flowers on the web but have been afraid to try to start one...it's been years since I've crocheted and what I did was very basic easy beginner stuff. I'm going out to get some cheap yarn to try a few before working on a larger project. Would you expand your tutorial to include how to make african flowers into squares? Thanks again!
What a fantastic tutorial. So helpful. This is going to the top of my crochet to do list.
Thank you so much for this tutorial!! I've been trying to make it without success, can't wait to follow your instructions!
Just a note to say a big Thank You for the beautifully clear tutorial!
It's very kind of you to take the time to share..it looks like it must be a lot of work but it's appreciated.. thanks!!!!
Just home and dropping with fatigue. But your colors were like a bright, heady scent, and your tutorial was characteristically clear and beautifully framed. And good-on-ya for that, because i'd have understood not a word otherwise, fried-minded as I am. You are lovely, Heidi.
What timing! This was a wonderful tutorial- because of it I was successful at my second try. Look forward to visiting the rest of your blog. cheers.
Thank you so much for this great tutorial. I love the way this turns out. I also have signed on as a follower, when you have time please stop by and see me. Take care.
Thanks for your kind comments everyone!
Hi, Heidi - Just found your blog and love it already! Thank you for the link - will link you back. :-)
And thank you for posting this detailed African Flower hexagon - it's coming up in my list of projects. I may even give one of your knitting tutorials a try - you explain things so clearly!
-Erica
Oh, Heidi! I KNOW I left a comment here. I wonder what happened. It was full of compliments for you. You do such a lovely job explaining. And these colors are good enough to eat. I love the shot of the first green outline.
i just found you blog via flickr & i love it!
thank you so much for this tutorial!
So nice to visit your blog and thanks for the tutorials :) I'll be back !
Good job on the tutorial Heidi ! Well done
Louise x
Question about the fouth round. Here is what you wrote: Continue to work you way around the hexagon...6sc, dc, 6sc, dc etc, until you get back to the beginning...as always, join the round by slip stitch into the first sc.
There are 7 sc in the previous round for each 'petal', should the instruction be 7 sc, dc around? When I counted the stitches in the picture, I thought I counted 7 sc (besides the dc) also.
Hi everyone,
"Always Right" has so kindly pointed out an error in the 4th round of this flower....it just shows you, I have read and re-read this tutorial more times than I care to count, and what do you know....the thing slipped right past my gaze! Sorry everyone, I have now corrected the post and hopefully there aren't other mistakes....please let me know if you spot any?
Thank you "Always Right" for pointing it out...much appreciated :)
Thank You!! I really appreciate you doing this for us. I've been mooning over others' work on flickr and I'm so glad to see how it's done. I'll try these for the Granny-a-day challenge.
Thank you everyone for all your comments! I appreciate your feedback so much...
♥
Just started making these gorgeous little flowers over the last week and it took a bit of practice - your tutorial is brilliant - thanks!
Hello Heidi
Thanks so much for this great tutorial. I too have been afraid but not anymore!
Very clear instructions,
great photos.
Hugs Suex
www.sunshineinternationalblanketsoflove.blogspot.com
www.suesfavouritethings.blogspot.com
Thank you for this!
This is a wonderful square - so simple to crochet, but the end result looks complicated. Thank you for sharing!
Wow. This is a great tutorial and what a huge effort you have put into this. Thank you x a million, you are fab.
karen
wow what a fab tutorial.
thanks x a million for the huge effort you put into doing this
Karen
Your tutorial is really helpful and easy to follow. I esp love the way you crochet the yarn's ends together at the back. I tried this idea and now I have less work and they're neater! I've also linked this tutorial to my blog today to share with my readers. Thanks so much for sharing!
I love your blog it is so beautiful and I love this African flower hexagon square I can't wait to try making it. I love how you show making it in the tutorial it helps me alot. I look forward to see many of your projects.
Thank you. I love this.
Thank you so much for the fantastic tutorial!!! My first African Flower Hexagon is finished :o)
Love your blog by the way ;o)
~Elin from Norway
Thanks for providing a translation! I just posted about a blanket I made using the Afrikaans pattern - I'll be sure to add a link to our tutorial.
Thank you soooo much for doing this. I am much more of a visual person and this was perfect - made it first off. I can even understand the written pattern now.
A great tutorial, thank you very much for sharing it!
Already one of my favorite blogs!
Hola Heidi,
Greetings from Spain. I'm a beginner in crocheting and few weeks ago I "discovered" the African Flower and fell in love with it... but could not manage to figure out the pattern. Today I found your blog and I must sincerely thank you for the simplicity of your tutorial! It must have taken some time for you to do it but it's absolutely fantastic...I've done several flowers in such a little time!
From now onwards I'll follow your blog. No doubt about it!
Thank you! Gracias!
Ana
Heidi, thank you! If I can't follow this, I have no business crocheting!! :-) I can knit circles around people, but I always end up a stitch off or with a pentagon instead of a hexagon when I crochet. Can't wait to give this a try with your awesome tutorial! Thanks!
Hi Heidi, thank you so much for this tutorial. I've been after a clear version of this for a while and yours is great =]
I come from flickr, THANK YOU so much for this wonderful tutorial!
Oh, thank you so much for the tutorial - your blog is just beautiful and full of lovely creations and instruction.
lovly flower...
can i use your photo to link to tiis tutorial from my blog?
stinne
http://raccoon-design.blogspot.com/p/diy.html
Thank you so much for the tutorial, perhaps you would like to see what I did with it in my blog.
merci beaucoup !
Adorei o passo a passo, afinal... adorei o blog. bjos, Josy
thanks !!
Simply beautiful your blog, loved the colors, the recipes, everything, thank you, hugs.
translation Google
Simply beautiful your blog, loved the colors, the recipes, everything, thank you, hugs.
thanks for this tutorial it is great. I really had no idea what to do with out seeing this.
y por fin llegue! uff encontre tú blog y encontre el tutorial de granny de la flor de Africa . te cuento que ya realice uno y ya te estoy llevando a mi casita .. a ver cuando me visitas..
besos desde Argentina
Your tutorial is absolutely awesome. Thank you so much. I am very glad I found your blog!
Having visual tutorials like this are just wonderful, thankyou so much for taking the time to photograph and explain it so well
:0) I am so thrilled to have made one and have decided that this is what my next project will be. Thanks again. Annette :0)
Hi Heidi, I just found your blog and I love it. Thank you for the tutoria, I love the color you used for the flowers; very colorful.
Thank you so much for posting this and for making it so clear!!
neat tutorial... i loved it... i tried this african flower yesterday... but had sooooo many doubts.. now i'm clear... thank you...
neat tutorial... i loved it... i tried this african flower yesterday... but had sooooo many doubts.. now i'm clear... thank you...
Grazie di cuore di passo a passo,un bellissimo fiore,ci provero oggi farlo.Bacio.
What kind of yarn do you use? I tried cotton and it was too hard to work with and got bunchy. The wool wasnt as clean and smooth looking as yours.
What kind of yarn do you use? I tried cotton and it was too hard to work with and got bunchy. The wool wasnt as clean and smooth looking as yours.
Hi Heidi, the tuto in wonderfull! Thanks so much for this beautifull flower. I try as soon as possible.
Laura
Thank you for posting this tutorial. The one I found on Flickr was confusing. Yours is great!
I love this square and I can't wait to try the pattern :)! may I show how to do it in my YouTube channel? of course I'll quote your blog!
Just wanted to let you know that you were featured on my blog WouldYouLikeYarnWithThat.Blogspot.com. I really love this pattern! THank you for the tutorial!
Hello Heidi. I am Arantza, from Fuengirola (Spain). First, thank you very much for your tutorial. It is very well done. I am making a blanket to cover a rocking chair. I would like to link your blog in mine but I would like to have your permission. I am waiting for your answer. Thanks again.
Wish I had found you before I struggled with the pattern on flickr. In the end I just downloaded a picture of a motif and blew it up and went from there...no instructions needed! But yours is so understandable! You are amazing! Keep up the great work Heidi! Gloria C.
Hello again Heidi. Congratulations for the Spanish tutorial. Love Arantza
Cute! Thank you for share this nice and easy pattern with all of us! I really enjoy crocheting it!
I'm now one of your followers too!
This is a really beautiful tutorial, really straightforward and so pretty!
Thanks x
MUCHAS GRACIAS por publicar estas explicaciones en español!!!!!!
Me parece bastante claro e intentaré hacerlo.
Un abrazo desde Montevideo, Uruguay
Hello Heidi,
thank you very much for this tutorial. Easy to follow round-by-round instructions and pics included as well.
I'm just in the 'trial' mode practising one flower in single colour - no problem at all.
Thanks again
OMG! I was so impressed with how easy this was to make. I made my first one tonight with some embrodery floss but it still turned out amazing! Thanks so much for sharing!
This is such a great tutorial. Thanks for the step-by-step!
De un enlace a otro , llegué a este tutorial tuyo que me ha encantado . Muchísimas gracias por tu traducción al español. Un abrazo desde Madrid.
Gracias por el patrón en castellano
Soy una principiante y a veces es bastante complicado leerlo en inglés
Es adorable la combinación de colores y el espejo te quedó hermosisisimo
Cariños desde Buenos Aires, Argentina
Gracias por la tutorial.
Félicdades pour tu bello blog.
http://fluxcreativite.canalblog.com
Querida Heidi adorei o seu blog, já estou te seguindo.
Venha conhecer o meu blog também, será uma alegria!!!
beijos,
Marlene
You're my inspiration.... muchas gracias Guapa! x
You're an inspiration. Gracias Guapisima x
Hi Heidi, I've just found you through a link on 'The Flower Bed'.
I've been working on some of my own designs, but so far not very happy with them. I think I may use yours to make a throw. Hope that's okay. Love the tutorial, nice and clear.
Hallo Heidi,
was für eine tolle Häkelanleitung, vielen lieben Dank dafür!!
many, many Thanks and Greetings from Germany
have a nice Day
Traudi
hi heidi! adore your blog, absolutely beautiful and supportive, I'm doing with your explicacion.ya African flowers follow you! visit my blog.amor and peace ♥gracias por la explicacion en espaÑol!
Heidi!! thank you very much for showing the instructions!
They are beautiful!
Kisses from Buenos Aires!!
Vanesa
¡Qué belleza de blog! Llegué de enlace en enlace y qué sorpresa.La traducción al castellano del tutorial es una ayuda maravillosa. Gracias y te sigo viendo.
Saludos desde Montevideo, Uruguay.
I looked and looked all over the internet to find exactly what I had in my mind. Here I found it with amazing instructions. Thank you! jan
thanks for sharing this crocheted flower, this is awesome. im sure gonna try this pattern.
Thanks so much to share this gorgeous tutorial, it's great!.
Greetings from Spain (and sorry for my english)
tnx for making this tutorial! without it it would never looks like a flower in million years..
kind regards daan
eenkloddertjerozehier.blogspot.com
Genial! Por fin me animaré a hacer una ;) Muchas gracias!
I just made my very first african flower- no way I could have done it without your amazing tutorial, you helped me all the way through and I am, as Germans say, "proud as Oscar" of my very first finished specimen.
Thank you so much for being generous and patient enough to share this tutorial, you deserve a medal. With petals. Crocheted.
I have pinned you on my pinterest, hopefully many more folks will find their way over here.
Such a beautiful pattern! I am enjoying learning it, thank you!
Hi,
I love your DIY, it´s so easy to follow.
Hope it´s okay that i linked to your blog, when I wrote about the african flower on my one blog?
www.ria-kirstine.blogspot.com
The blog is in danish
Thanks - Ria-Kirstine
Just discovering the joys of hexagons, thanks so much for sharing this, it will make a lovely blanket for my daughter!
Hi Heidi, I made this cute little pillow with the help of your tutorial. Thanks!!
http://simplymadebyerin.blogspot.com/2011/07/crochet-african-flower-hexagon-pillow.html
Adore este tutorial! Gracias a vos hice mi primer flor africana! mil gracias! abrazos desde Argentina
Hi Heidi,
Your blog is so much fun. I actually found via a link from my Facebook/Blogger friend Nicole of "My Mad World" She posted a link to this tutorial...and I just LOVE it...so bright and colorful :):) Plus, I was really intrigued about the instructions also in Spanish :) :) I also speak fluent German and some Norwegian. IO'm planning on learning Spanish again...so this is so very helpful :) :) What inspired you to write your blog in both languages? Thanks again for this wonderful tutorial. The photos and instructions are great. Oh, one question, are your crochet instructions using American or UK terms?
I love to knit...and I"m starting to get into crochet now, too :) :)Have a lovely weekend. Love and hugs from Oregon, Heather :)
QUERIDA AMIGA, TUS TUTORIALES SON FANTÁSTICOS,YA SOY TU SEGUIDORA, ESTAMOS EN CONTINUO APRENDIZAJE. CARIÑOS.
Hola Heidi. He llegado hasta tu lindo e instructivo blog buscando hexágonos de crochet. ¡Me ha encantado tu African flower hexagon y el espléndido tutorial! Muchas gracias. Me hago seguidora, con tu permiso.
Besos desde Marbella, España.
Hi , i beautiful!!!
thanks
hugs,vania
Thank you for this! I have been dying to make these and had a hard time finding a pattern. No one mentioned the size hook or the yarn. I appreciate this more than I can say. I'm going out to buy supplies today and I'll come back and follow your tutorial.
When I get several of these made I'll post them on my blog and add a link back to your tutorial if that's okay with you.
Thanks!!!!
Faye
(wildrosevintage)
I did it! I have one made so far and it's perfect! Thank you for this wonderful tutorial.
Faye
Gracias por el tutorial de la flor africana.
Un saludo.
Thank you so much for this wonderful tutorial! I have tried a few times before but I think this will work perfectly for me and I can't wait to make some.
I can NOT thank you enough for this. With your precise, clearly shown pictorials along with the simple explanations of the pattern, I have now made one motif. Without you I wouldnt have been able to make this. All of the other patterns have been so confusing and for something like this I NEED visuals. Thanks so much! I am already on Ravelry and I may join your group.
Great! thank you, i'm trying this right now :-)
Thank you for such easy to follow tutorials!!! I haven't crocheted for 25 years since I made a blanket for my newborn daughter!! LOL
Can't wait to try this and your crocheted rose.
que bueno!!! muchas gracias por el tutorial, en inglés y es castellano, se entiende muy bien, me encanta este dibujo y creo que gracias a tu tutorial lo sabré hacer y que quedará super bonito
muchas gracias de nuevo por tomarte tu tiempo en hacer esta gran labor =^_^=
Heidi!
thank you so much for this tutorial. I have bookmarked it for a future project and I just made my first flower!!!
thanku so much for the tutorial i like it.
Great tutorial. Thanks.
obrigada pelo pap, adorei vou fazer uma manta ac ho que vai ficar belissima
multumesc (thank you)!!
multumesc (thank you)!!
Oh! merci beaucoup pour ce tuto.. il est parfait.. Grace à vous j'ai réussie ma première fleur Africaine..
Have nice Day Heidi
Thank you very mush for your tuto.. It's perfect for me newbie on crochet.
Thank you very much . i want to do the Bear , so I'm trying to do flowers. I could do my first one !
Gracias por todo!Bueníssimo!!
Thank you so much for your clear, easy tutorial! I have looked at various other hexagon tutorials, but your pictures simplify everything & give me something concrete to compare my work to as I stitch along with your instructions. It really is a beautiful pattern & I am enjoying playing around with different colors. I make blankets for the NICU where my daughter stayed & this is a beautiful, easy pattern to make each baby a unique, special gift to take home with them. Happy Crocheting!
What a wonderful tutorial. I have been crocheting for years and always wanted to attempt some motif work. I ran across your pattern while searching scrap yarn afghans. Together with your other tutorial on adding as you go I have a beautiful throw in progress. Of course, I HAD to purchase some more yarn! I am using a blindfold method of selecting colors. What fun, thank you so much for taking the time to share with us!
Hola,lleguè a ti desde el blog de Luna..me encantó todo lo que haces...hace algun tiempo vi uno de tus osos y me gustó muchisimo...
desde ya te sigo...muchos cariños y gracias por compartir.
are you still doing a swap with these? I have been in one on Ravelry and would love to join in or start a swap with these lovely flowers :)
Thanks so much for the tutorial! I just made my first flower hexagon and it came out great with your help. Thank you so much!
Great tutorial! thanks for sharing.
Heidi, muchísimas gracias por tu tutorial. Me ha ayudado mucho; tanto que, sin tener más que 4 ideas básicas de crochet, me he lanzado a hacer una manta multicolor que me está quedando preciosa... estoy encantada con ella. Un beso, B.
Thanks for posting this. It's very well done and I'm having a great time making these.
Fantastic tutorial I've started my blanket :-)
http://crochetaddictcfs.blogspot.com/2012/01/wip-wednesday-040112.html
Acabo de terminar mi primer Flor Africana. No ha quedado asi de bonita, pero seguiré intentandolo hasta que quede perfecta y despues le hare una colcha maravillosa a mi querida hija. Mil gracias por tus explicaciones.
Tak for en dansk oversættelse :-) dejligt
Hi Heidi. It's a beautiful flower and I would love making it. Maybe you also have a tutorial for overlay crochet motifs? If so, could you share one? Thank you.
Thanks a lot for your wonderfull tutorial! I love these flowers and started to chrochet. Hope to get this blanket (http://nozdesign.blogspot.com/2012/02/african-flower.html) ready this year :-)
Liebe Heidi,
vielen Dank für deine tolle Anleitung.
Ich freue mich sehr darüber und bin fleißig am häkeln.
GGGlG Diana
Have got to try this....probably today. I hope to get my mo-jo down as to make one right after the other!! I wish I had your sense of color. Thanks so much for the pattern and inspiration!!
Thanks so much for such a clear, easy to follow tutorial! Tried others and failed but just finished mt First African Flower thanks to you. Very much appreciated - keep up the excellent work :)
Oh. My. Gosh. I think I love you. Seriously, I have seen these flowers a lot and never found a clear tutorial. I am SOOOOOOOOOOOOOOOO happy I did not give up on trying to find a pattern. I will be trying this out later today as it is 1am at the moment and I should be in bed already. I couldn't sleep until I found a pattern for these though. Thank you!!!!!!!!!!!!!!!!!!!!!!!!!!!!!!!!!!!
Love these flower grannies! Thank you very much for the pattern!!! Liz
Heidi, this is a Rosetta stone of a pattern, just fabulous. I am learning Spanish AND crocheting, and your pattern is going to be so helpful. I can work on my crochet skills AND my Spanish vocabulary AND make a lovely hex flower. It doesn't get any better than this! Thank you so much!
Kate
This is just wonderful, thank you for your time in putting such detail and awesome close up shots... Must stop working on my Hex tote and give this a try. Have a great week..i will spread the word. (:
Hi!! Thank you very much for this tutorial!!
I made a pair of earrings using this pattern!
Thank you!
Laura
http://laubao.wordpress.com/2012/05/14/la-febbre-dei-semi-seeds-fever/
Hola Heidi:
Muchas gracias por tus explicaciones, tan claras, y además, traducidas también al español.
Gracias a ti, yo que soy una auténtica novata tejiendo crochet, he conseguido hacer esta maravillosa Flor Africana.
De nuevo muchas, muchas gracias.
Un beso desde España.
Muchisimas graciasssss!!! Estoy iniciando con el crochet y me ha sido de mucha ayuda tu tutorial. SAludossss
Thank you very much! This tutorial is great!
What a great tutorial! I am so not complaining but it took me forever to view the entire thing...I kept getting distracted by all the interesting items you've got going on the right side! Fantastic site!
this tutorial is great.
if you'd like a translation in Dutch, let me know. Lots of people in Holland like to Crochet!
Dear Heidi, thanks for wonderful tutorial! Hugs, Irena, Zagreb
Hej
Jeg tænkte du gerne vil se hvad jeg har fået ud af din tutorial.... Tak fra både mig og min svigerinde som havde bestilt en taske af African flower....
Mvh Stinna
merci pour le tuto.
Hi Heidi!
Thank you so much for the tutorial, so helpful and easy to follow!
I made some flowers and posted them on my swedish blog with a link to your site and tutorial. Hope you don't mind.
Muchas gracias! Son preciosas
hola heide. muchas gracias por el tutorial, hice la flor africana porque me encanta y pienso hacer un proyecto que tengo en mente con esa flor , estuve revisando en otras paginas pero no lo sabia hacer y no explican bien, pero el tu tutorial es fantastico , desde hoy soy tu seguidora. besos
Hola Heidi !!! muchas gracias por la traducción, cariños desde Argentina
Hola Heidi !!!
Muchas gracias por la traducción, estupendas fotos.
Cariños desde Argentina
muchas graciasss!!! me parece un motivo muy bonito!!!saludos
muchas gracias!!! me parece un motivo precioso para un cojin, saludos
Lovely pictures! Thanks for taking the time to put this tutorial together!
Hi Heidi many many thanks for your tutorial I'm dyslexic and have a hard time with instructions.So how thrilled am I that you did this by pictures so many thanks {{{BIGHUG}}}
Pauline aka {Lizmaynz}
many thanks! your tutorial is so great!!!thank you!
could you tell us wich yarn you're using? thank you:o)
tara
http://carnetdenotesandcie.over-blog.com/
Thank you for sharing this wonderful tutorial with us. This will make such a good "take with" project!
Thanks for the great post on your blog, it really gives me an insight on this topic.
I love your detailed but simple to understand tutorials with pictures!! I have never knitted. Your tuts are definitely going to help.. thanks!, Beth
Thanks so much
Very helpful tutorial. Thanks for sharing.
Patent Lawyer
Hi Heidi - I refer to your detailed tutorial on my blog. Hope it is OK with you? xxxx
Greetings from FL. Your tutorial is easy to follow - love it. Your designs are great, u truly have a creative mind. Cheers
I love your tutorials! They are so easy to follow. Thank you for sharing them!
love,
another Heidi
Your tutorials are so clear! Thank you for sharing them.
love,
another Heidi
Thank you for your great tutorial. This is my absolutly first time making hexagons at all!!!
I would love to make my son a blanket with these hexagons, but to make it beautiful I need a pattern for ½ hexagon, do you know how to make that or can you post a link or something that showes how to???
thank you for this wonderful blog
regards all the way from Denmark
You are the best ever teacher! So glad I've stumbled onto your page. I have started up the craft again after years of not crocheting and am oh so ready to try anything. God bless and have a happy weekend.x
Hola Heidi, gracias por compartir tus conocimientos, lo explicas muy bien.
Hermoso tutorial.Muchas gracias .
Thanks Heidi!!
Your tutorial is great, I did it at my first attempt!!!
Thank you so much for such an easy tutorial!!! I have a silly question, I'm trying to make a ball for my niece but I'm running out of time, is it really necessary to weave in ends?? Will they show if I don't?? Not that I'm lazy but I'm seeing her in a couple of days and I still have a couple more hexagons to go and I would like to have it all done by the time I see her.
Thanks!
Hi Ale :)
Thank you for your kind comment! Whether or not to weave in the ends depends on the stitch density you have on your project...if there are spaces between stitches that you may see through, you will have the ends sticking out (just because that is how life works doesn't it? ;) )...so you will need to try and minimize that by weaving in...however, if your stitch density is very tight, you could get away with not weaving in...the best situation is for you to weave them in as you go. Whenever I make my animals, I only sew in one tail, which is the start of a Magic Ring...all the rest of the yarn ends are woven into the next round as you crochet it...I would go nuts trying to sew in all the tails on my animals...
xxx Heidi
Hi Heidi,
Thank You so much for the tutorial, I'm gonna make a bag and a scarf using these flowers... I have to remember to send you a picture when done :)
There's one thing in the tutorial, that for me seems like a small flaw: When finishing the second round (2dc, chain, 2dc) shouldn't there be one chain after dc just before joining the thread to the 3th of the first chain...? At least I've made it that way to make a "hole" there, too.
I'm so glad I found your blog, beautiful pictures and excellent tutorials!
Warm greetings from Finland to you dear! <3
oh wow oh wow, just found your blog through fb from crochet crowd, this is defo going to be my next project. from south african living in ireland. its wonderfuld to get ideas from home. God bless and happy hooking.
Just found your blog & wow what a find!! Your tutorials are fabulous! So clear & easy to follow. I've got loads of crochet books but so often give up on projects in them because I hit a problem with the pattern at some point. I had just that situation last night, trying out a new square for a quilt but it just wasn't happening so I gave up frustrated. now I'm going to do your beautiful African Flowers Hexagons! Easy! Thank you SO much! Tricia in UK
I really think your work is utterly fantastic, I love the animals and shawls and of course these Flowers. I have tried to crochet them several times and could not get the "hang" of it, But then I watched your blog and wow it blow my mind.. I sat down and made 3 of them . Thank you so much..
Margie .
Wonderful, wonderful,wonderful blog.. Love all of it...I just watched how to do African flowers and it was great..( done 3 already)
Thank you so much.. I want to "tackle" one of the animals next..
Again Thank You.
Margie
What a GREAT tutorial. I am new to crochet and have heard everyone say how easy the granny square is....well, not for me. I CANNOT wait to get home this evening and make one of these. I am SURE this is exactly what I needed. I heard you on the Yarn Thing podcast and am an instant fan. Thank you.
Hi, I had to stop and say thank you for this fab tutorial. I have been looking for an African flower motif pattern for ages and yours is so easy to follow. Many thanks for taking the time to do this. Linda
Post a Comment